Monday, March 26, 2012

Made it Monday: Spring Banner

The other night, my friend and I ran to the grocery store to grab a few things to complete our meal, when a banner in the floral department caught my eye. It was so cute and I knew that I had to make one of my own for my seasonal table. I’m pretty sure I’m going to change the ribbon color on my banner (I’m just not diggin’ the pink), but I love the rest of it!

Here is how I made it:

I started out by cutting six pieces of burlap, each the same size.  I removed a few strands of burlap off of each end to make the edges appear frayed. Next, I used my cricut to cut out the word “spring,” making sure to leave space between each letter. By leaving space between each letter, it allowed me to use the vinyl surrounding each letter as a stencil. I placed my homemade vinyl stencil for the letters on  each piece of burlap and used craft paint to fill in the stencil.

After letting the paint dry for a bit, I took off the vinyl.

To finish the banner, I hot glued each of the letters to a piece of ribbon.

Can I just say that this banner is making me so excited for spring and my spring vacation!?!

Lexi

Tuesday, March 20, 2012

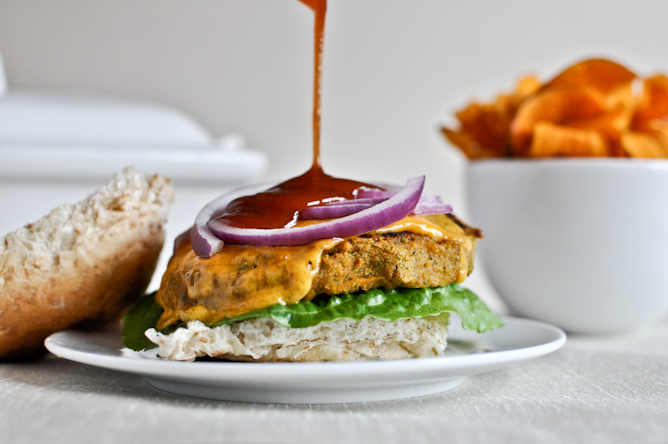
Tasty Tuesday: Chickpea Burgers

You know when you find one of those recipes that is so good you just have to share it? Today’s recipe is one of them!

My friend and I decided to make a “pinterest meal” on Sunday night (all our dishes were recipes we had found on www.pinterest.com) We decided to make Chickpea Burgers, Avocado Fries, and BLT Pasta Salad (this was actually a leftover from a gathering on Saturday night). Our absolute, hands down favorite dish of the night was the Chickpea Burgers! They were delicious, easy to make, and healthy!

I didn’t take pictures while making any of these, but I will link you up to the recipe source-http://www.howsweeteats.com/2012/03/bbq-cheddar-chickpea-burgers/ 

The only changes we made were that:

~We had our burgers on “slims” from Trader Joe’s instead of on buns.

~My friend also just chopped the veggies, rather than putting them in the food processor. We both liked having the veggies a little bigger in the burger. It added some texture.

These were so good that my friend and I are going to make another batch this week!

For those of you pinterest users who may have pinned the Avocado Fries, I would suggest skipping them. They were not good and were kind of time consuming to make.

The BLT Pasta Salad was good, but needed a little jazzing up. It was good, but lacked a little something. I remember my sister-in-law making this once, and hers was much better.

Happy cooking!

Lexi

Friday, March 16, 2012

Free For All Friday: Headbands

Tomorrow I will be running a 7K (just over 4 miles). It looks like the weather is going to be absolutely gorgeous! I thought it would be fun to make a cute green headband to wear for the run (since it is St. Patrick’s Day and all). I took out some scrap green fabric, vintage buttons, and elastic and here is what I came up with:

Lots of times I can’t wear headbands because they give me a headache, but this works out great. I can wear it all day! I loved this one so much, I made a gray one.

I plan on making more and changing some up a little. They are just such a fun accessory. I also made a couple for the girls that I nanny for. We made one flower out of a pair of leggings that had a hole in them, so it is a great way to be resourceful with your old clothes. One of these days I’ll try and post a tutorial…

Happy St. Patrick’s Day!

Lexi

Tuesday, March 13, 2012

Made it Monday: Lucky Wreath Part 2

Yay! Feeling much better today, so I finished the blog post and am ready to show you the “lucky” wreath (mentioned in yesterday’s post http://remnantsdiy.blogspot.com/2012/03/made-it-monday-lucky-wreath-part-1.html).

I forgot to take pictures of the first part, but this is how I started it. First, I cut burlap strips and wrapped a foam wreath, using hot glue to secure the pieces. Then, I rolled a whole bunch of rosettes out of scrap material (the green material is an old sweater) and hot glued them on. Initially, I thought the wreath was done here, but it just seemed to be missing something, so…

I cut the word “lucky” out of an old cereal box using my cricut.

Then, I sprayed each letter with spray adhesive,

sprinkled on some glitter,

removed the excess glitter, and sprayed them a second time with the adhesive.

I allowed them to dry for a little while and then hot glued them onto a piece of Jute twine. I secured it onto the wreath with pins. It could have been hot glued also, but pinning it allowed me to keep moving it until I found a spot where I liked it.

Have you been decorating for St. Patrick’s Day?

Lexi

Monday, March 12, 2012

Made it Monday: “Lucky” Wreath Part 1

I have been inspired by the many fun wreaths that I have seen on various blogs and in pinterest. I decided to make one of my own so that I would have a St. Patrick’s Day door hanger. I had planned on sharing it with you today, but forgot to write up the blog entry last night and today I’m feeling a bit under the weather. SO tune in tomorrow for part 2 of this post, where the wreath will be revealed!

Lexi

PS- Here are a couple of home remedies that I have found to be helpful in preventing the flu/stomach aches:

1- Ginger Root- you can either use real ginger root (just chop some up and swallow about a teaspoon; freeze the leftover root) or ginger root pills.

Now Foods GINGER ROOT

2- Black Walnut- I put about 10 drops in some water and drink it up. Repeat until feeling better. Really helps! I wish I would have had this at work today.

Herb Pharm Black Walnut

**These are the brands I use and the comments above are solely my opinions.

Monday, March 5, 2012

Made it Monday: St. Patty’s Day Frame

Can I just say I love the dollar frames from Michaels!?! They are such  a fun way to add a little bit of holiday spirit for a low cost. I have spruced up these frames for Christmas, Valentine’s Day and now St. Patrick’s Day. Here is the frame I made for a buck:

Here are the simple steps to making your own:

First, take your dollar frame and Mod Podge it. I like to use matte Mod Podge. (Yes, this is the back of the frame- I forgot to take a picture of the front before I put on the paper:)

Lay the scrapbook paper of your choice over top of the Mod Poged frame and add another layer of Mod Podge over the top of the paper. Allow the Mod Podge to dry and then cut the paper out of the center of the frame and from the outer edges. I like to use sand paper and sand the edges to get rid of any scissors marks or uneven cutting.

Next, I cut out a smaller piece scrapbook paper for the corner and Mod Podged that on. To complete the frame, I hot glued on two rolled burlap flowers.

Here is the completed console table (pre-picture).

It added such a cute touch to the St. Patrick’s Day table.

Happy Monday!

Lexi

Friday, March 2, 2012

Free For All Friday: Ruffled Runner

It’s Friday! Hope you all are going to enjoy some down time this weekend! I think I might actually have some time to relax tomorrow and I am looking so forward to it!


Today, I wanted to share the fun ruffled table runner that I made out of the leftover material from the shower curtain I made for my mom.


I was inspired by this post on pinterest:


Pinned Image


To start out, I cut the fabric based on the length and width of my console table, allowing a little extra fabric for the seams. Then I sewed a simple seam.


I could have stopped there (and I did for a few days since I ran out of time). It looked fine as is, but I knew the ruffles would add a cute touch. I decided to put 2 ruffles on each side. So, I cut 4 strips of fabric- two that were 2.5” and two that were 3”. On the two that were 3”, I sewed a seam around all the edges.


On the two that were 2.5” I sewed a seam on the two short edges and one long edge (the bottom strip in the picture). The edge I did not sew a seam on will be covered by the other ruffle.


On the top of each strip, I sew a gathering stitch. This will be the stitch that makes the ruffle.


Next, I pulled the end of the gathering stitch to make the fabric ruffle. Don’t pull too hard or your stitch will break!


Once all the strips are gathered, you are ready to pin the pieces onto the runner. Then, sew it on.


The next step would be to seam rip the gathering stitch, but I’m lazy and the thread blended in really well, so I left it. Usually I am more of a perfectionist, but you can’t see it unless you are really looking for it. It fits perfectly on the table!


Please ignore the frame with no picture in it! That should be fixed soon!


Enjoy your weekend!


Lexi


Linking to:


www.iheartnaptime.net